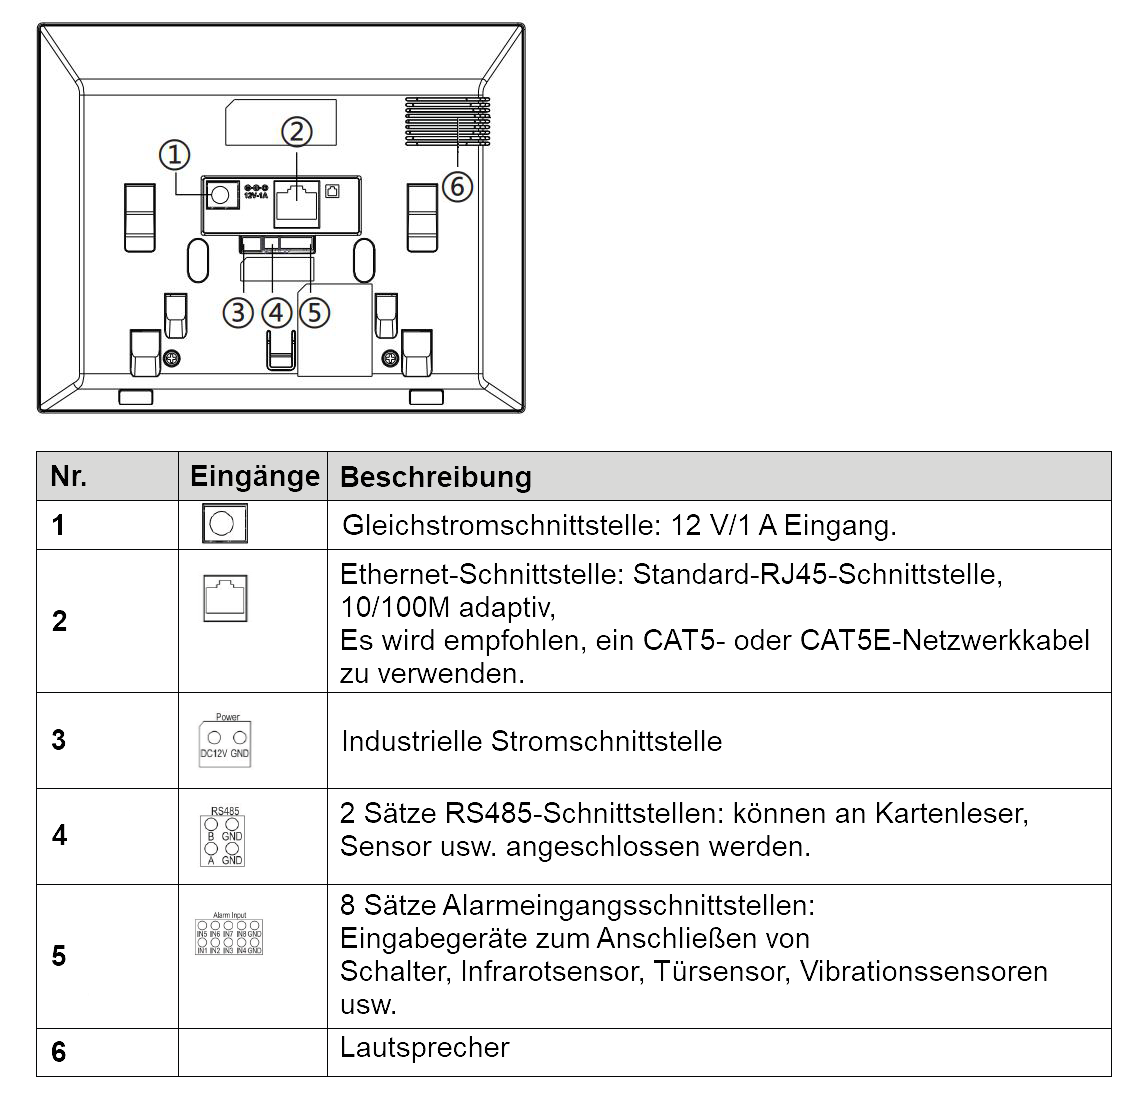
Peripheral Connection Diagram
Requirements
For correct operation, the Fanvil i53W must have at least firmware version 2.12.34 installed! Download firmware version 2.12.50 (unzip the ZIP file before installation):
i53w-fanvil-release-4908-2.12.50.1.1-krnvlT2025-06-24-17.18.24Download
Logging into the Fanvil i53W
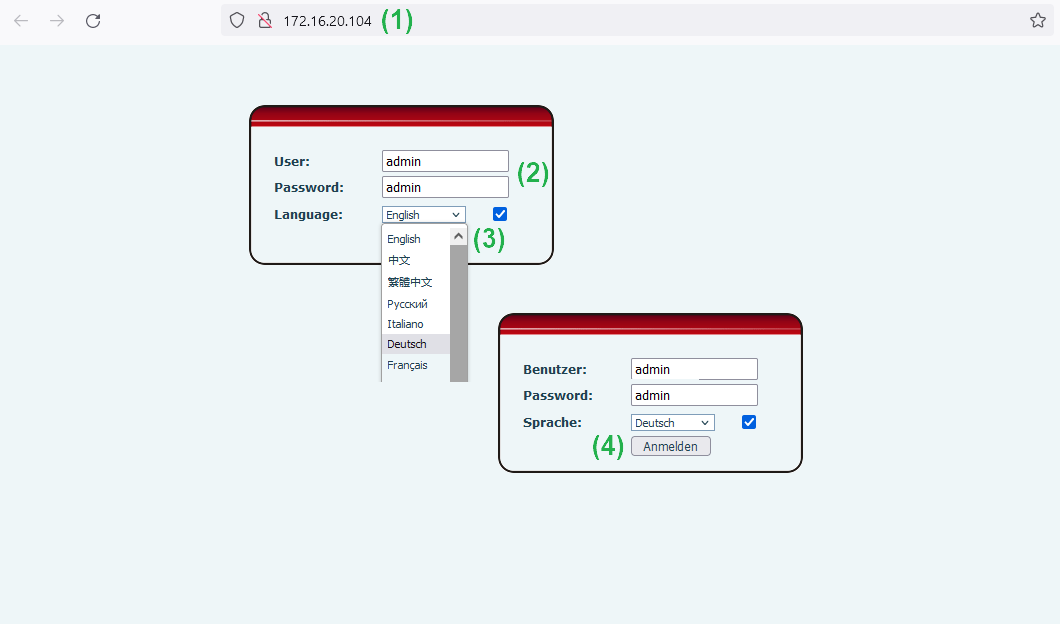
- Open the i53W web interface using the i53W's IP address.
- Enter the login credentials (both admin) into the fields.
- Select the language and check the checkbox.
- Click Log in
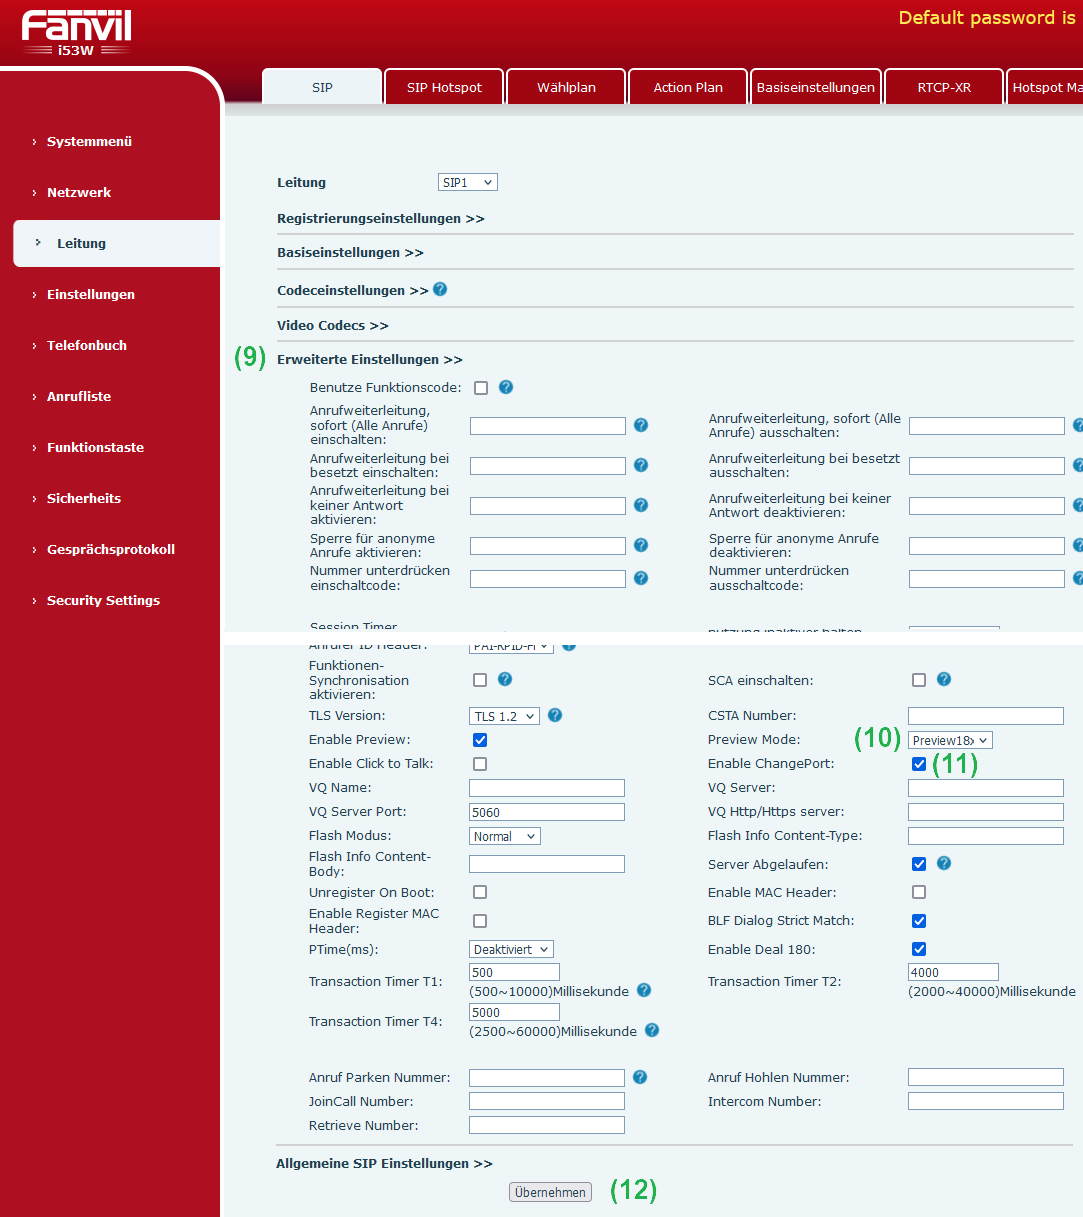
Enabling Direct IP Call and H264 on the Fanvil i53W
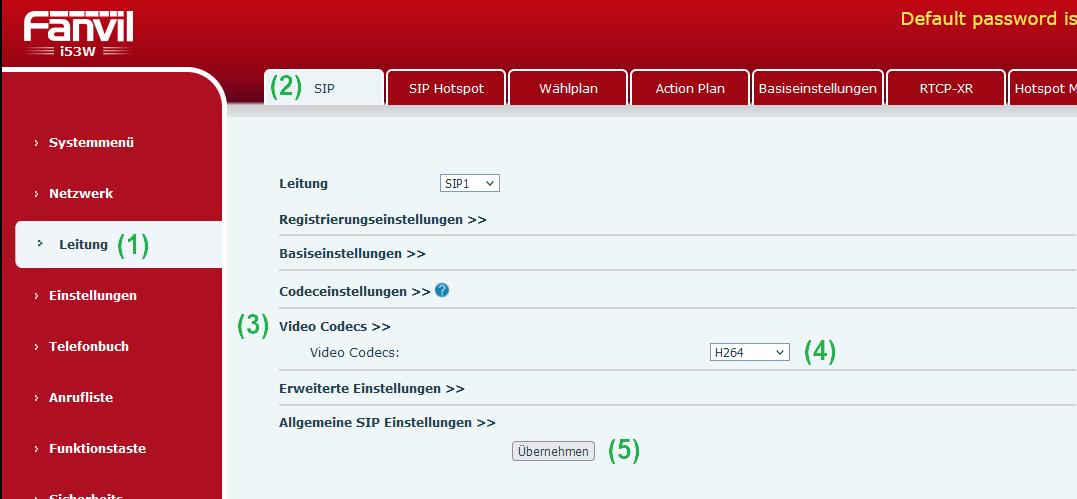
In the i53W indoor station's web interface, go to
- Line
- Tab: SIP
- Subsection: Video Codecs
- Select H264
- Confirm with Apply.
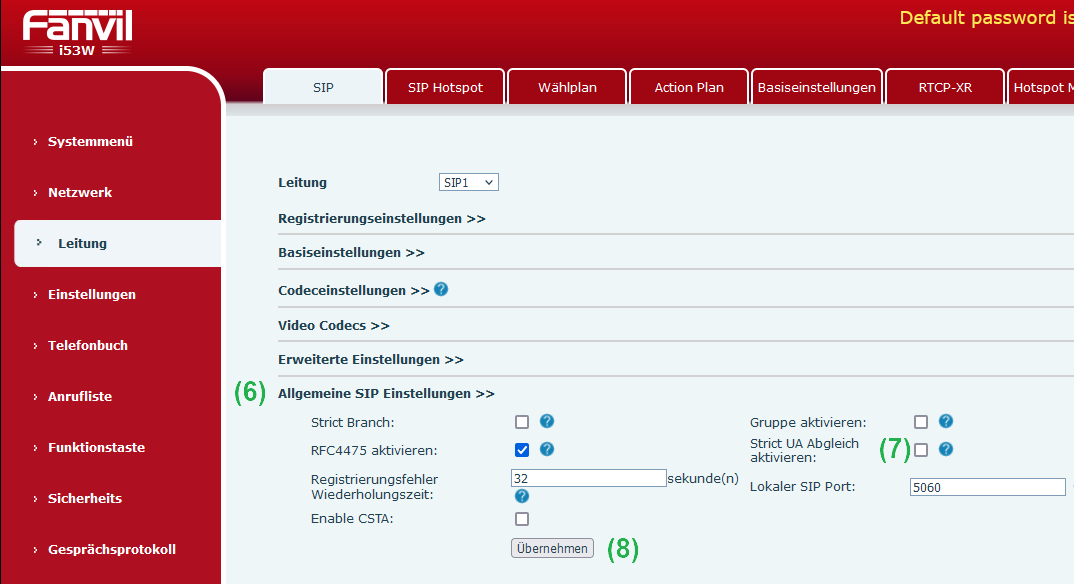
*>>> in the same *SIP tab
- Subsection: General SIP Settings
- Disable the "Enable Strict UA Matching" option by removing the checkmark
- Confirm with Apply.
*>>> in the same *SIP tab
- Subsection: Advanced Settings
- For Preview Mode: select Preview18x
- For Enable ChangePort, check the checkbox
- Confirm with Apply.
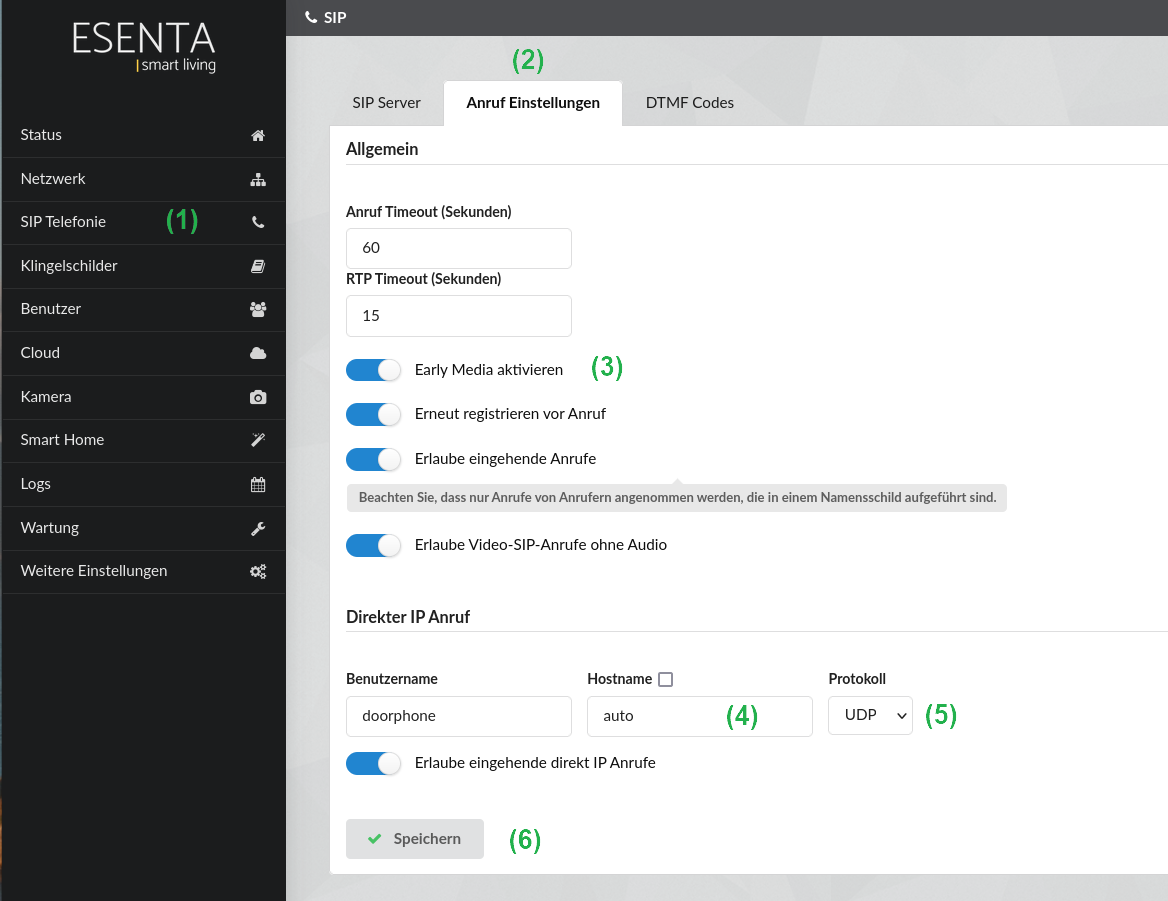
Enabling Early Media in ESENTA Sias
In the ESENTA Sias web interface, go to
- SIP Telephony
- Tab: Call Settings
- Enable Early Media
- For Direct IP Call: select hostname auto
- For Protocol: select UDP
- Confirm with Save.
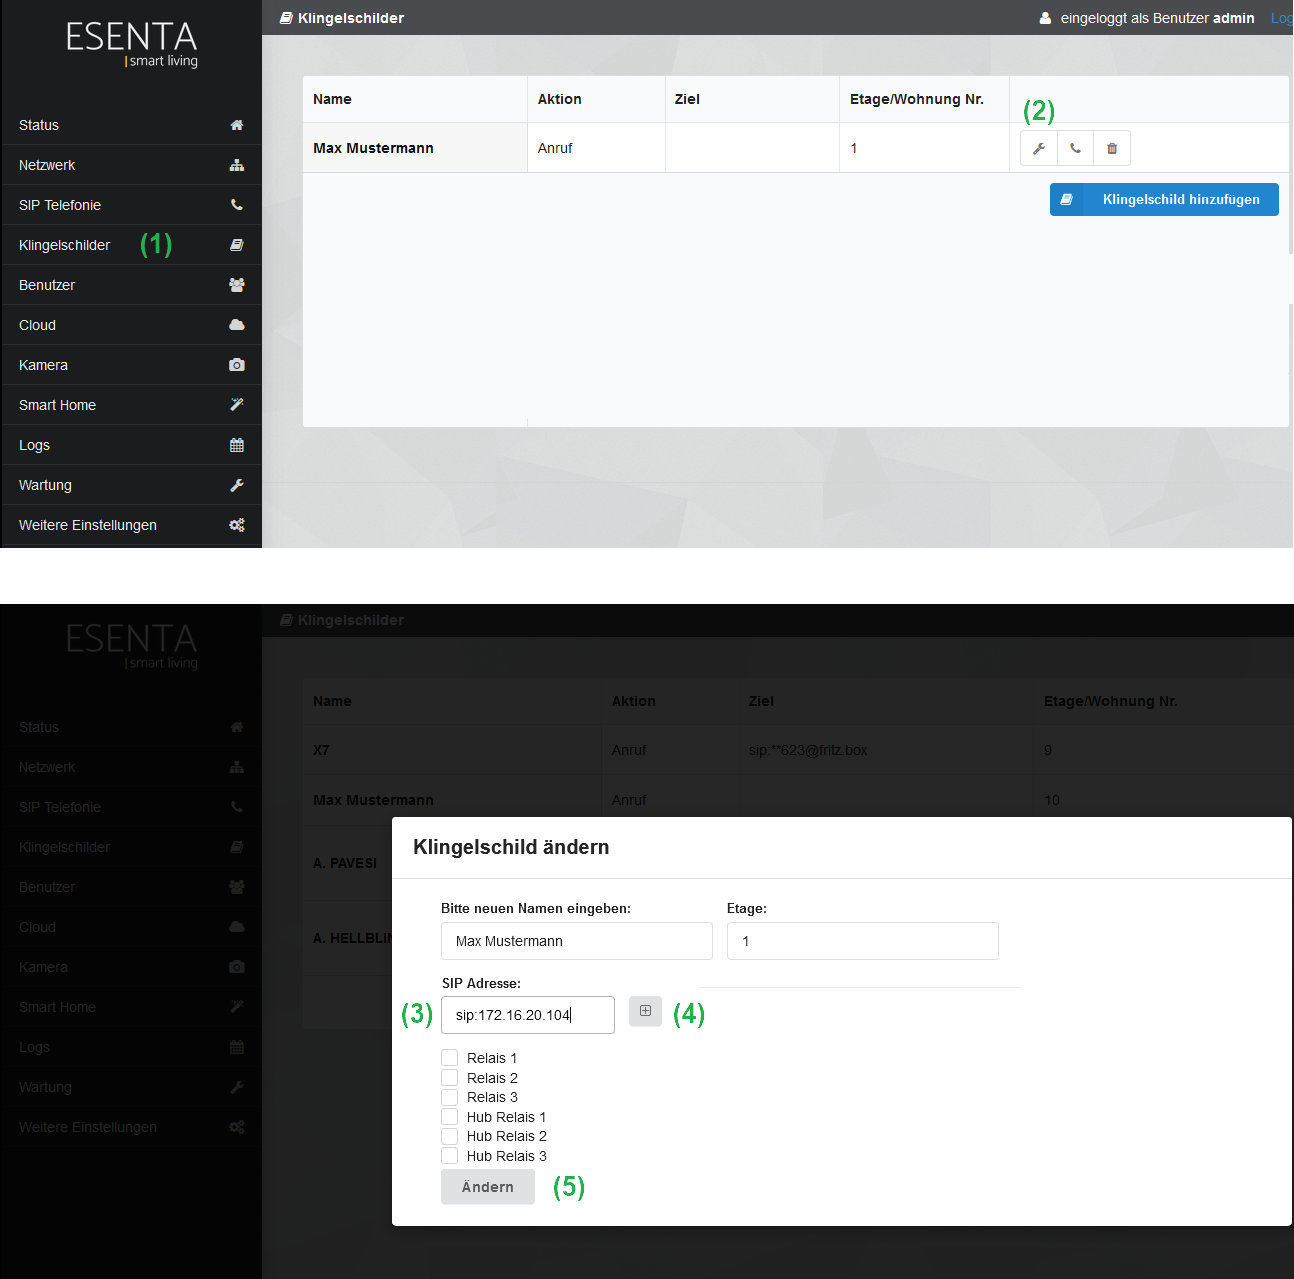
Adding the i53W IP to an ESENTA Sias Doorbell Nameplate
In the ESENTA Sias web interface, under Doorbell Nameplates, you can now set up a doorbell nameplate with a call destination in the form sip:[IP of Fanvil i53W]:
In the ESENTA Sias web interface, go to
- Doorbell Nameplates
- wrench icon
- In the "SIP Address" field, enter the i53W IP address as follows: ** sip:**ip-address(example: sip:172.16.20.104)
- Add using the + icon
- Confirm with Change.
Testing the function: When the doorbell button is pressed on the display of the ESENTA Sias outdoor station, the i53W should now ring and display the video image.
Programming the i53W's Physical Video Button
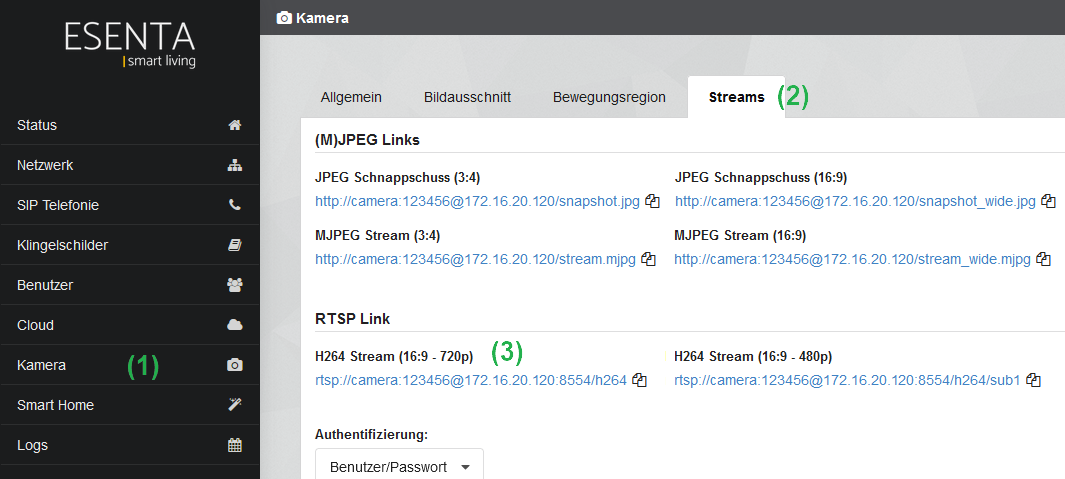
In the ESENTA Sias web interface, go to
- Camera
- Stream
- Copy the RTSP H264 Stream (16:9 – 720p) link
Switch to the i53W web interface and go to:
- Function Keys
- Tab: Function Keys
- In the row: DSS Key 2
- a) In the "Type" field: select URL
- b) In the "Name" field: enter ESENTA Intercom
- c) In the "Value" field: paste the RTSP link previously copied from the ESENTA Sias web interface
- d) In the "Subtype" field: select IP Camera
- Confirm with Apply.
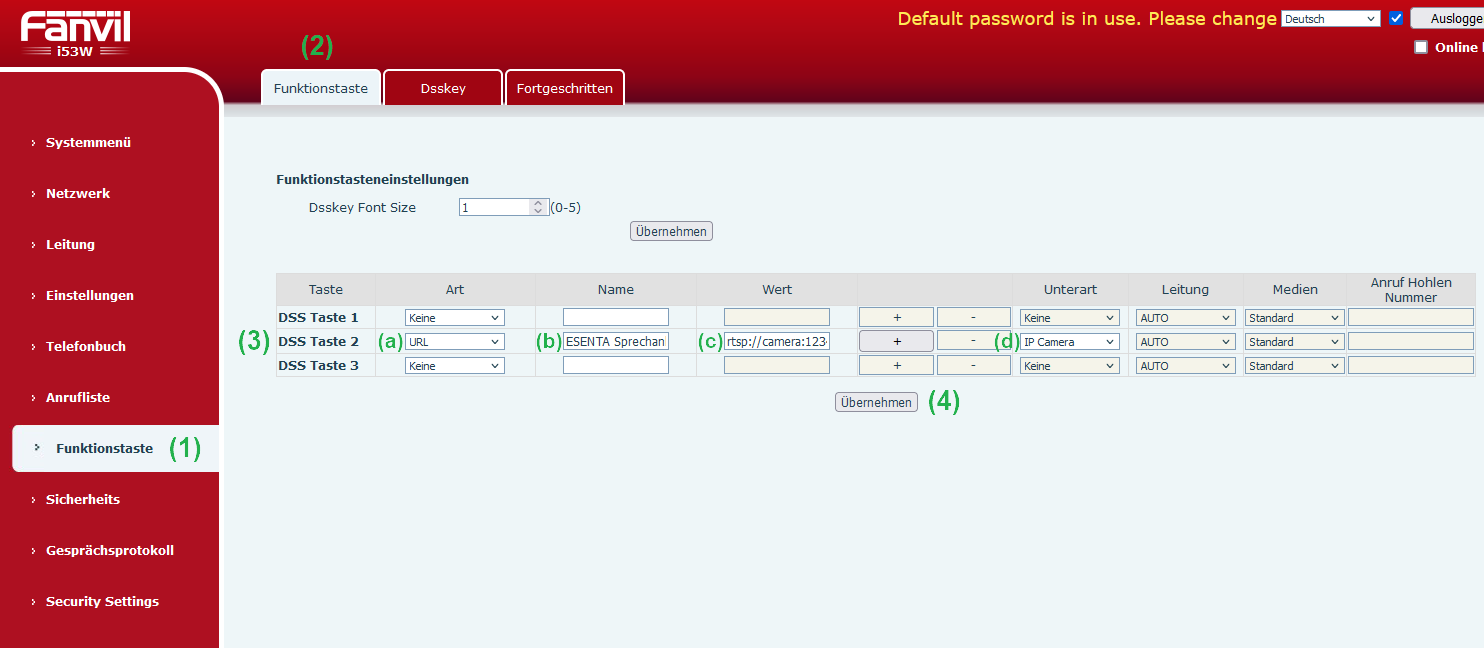
Testing the function: When the physical camera button on the i53W is pressed, the live image from the ESENTA Sias outdoor station's camera should appear on the i53W's display.
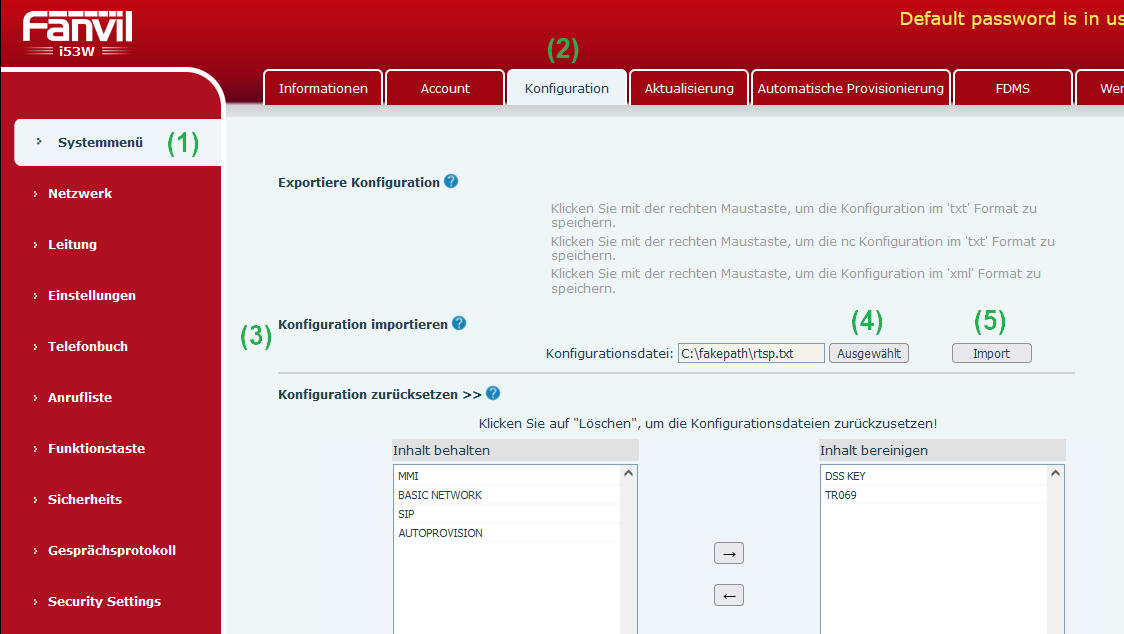
OPTIONAL: If ESENTA Sias and the Fanvil i53W indoor station are on different subnets, the "Rtsp Client Work Mode" must be enabled on the Fanvil i53W.
Steps: Download the rtsp.txt file via this link:
rtsp.txtDownload configuration file
and save it to your computer.
In the i53W indoor station's web interface, go to:
- System Menu
- Configuration
- In the row: Import Configuration
- Use Select to import the previously saved rtsp.txt file
- Confirm with Import.
Programming the i53W's Physical Open Button
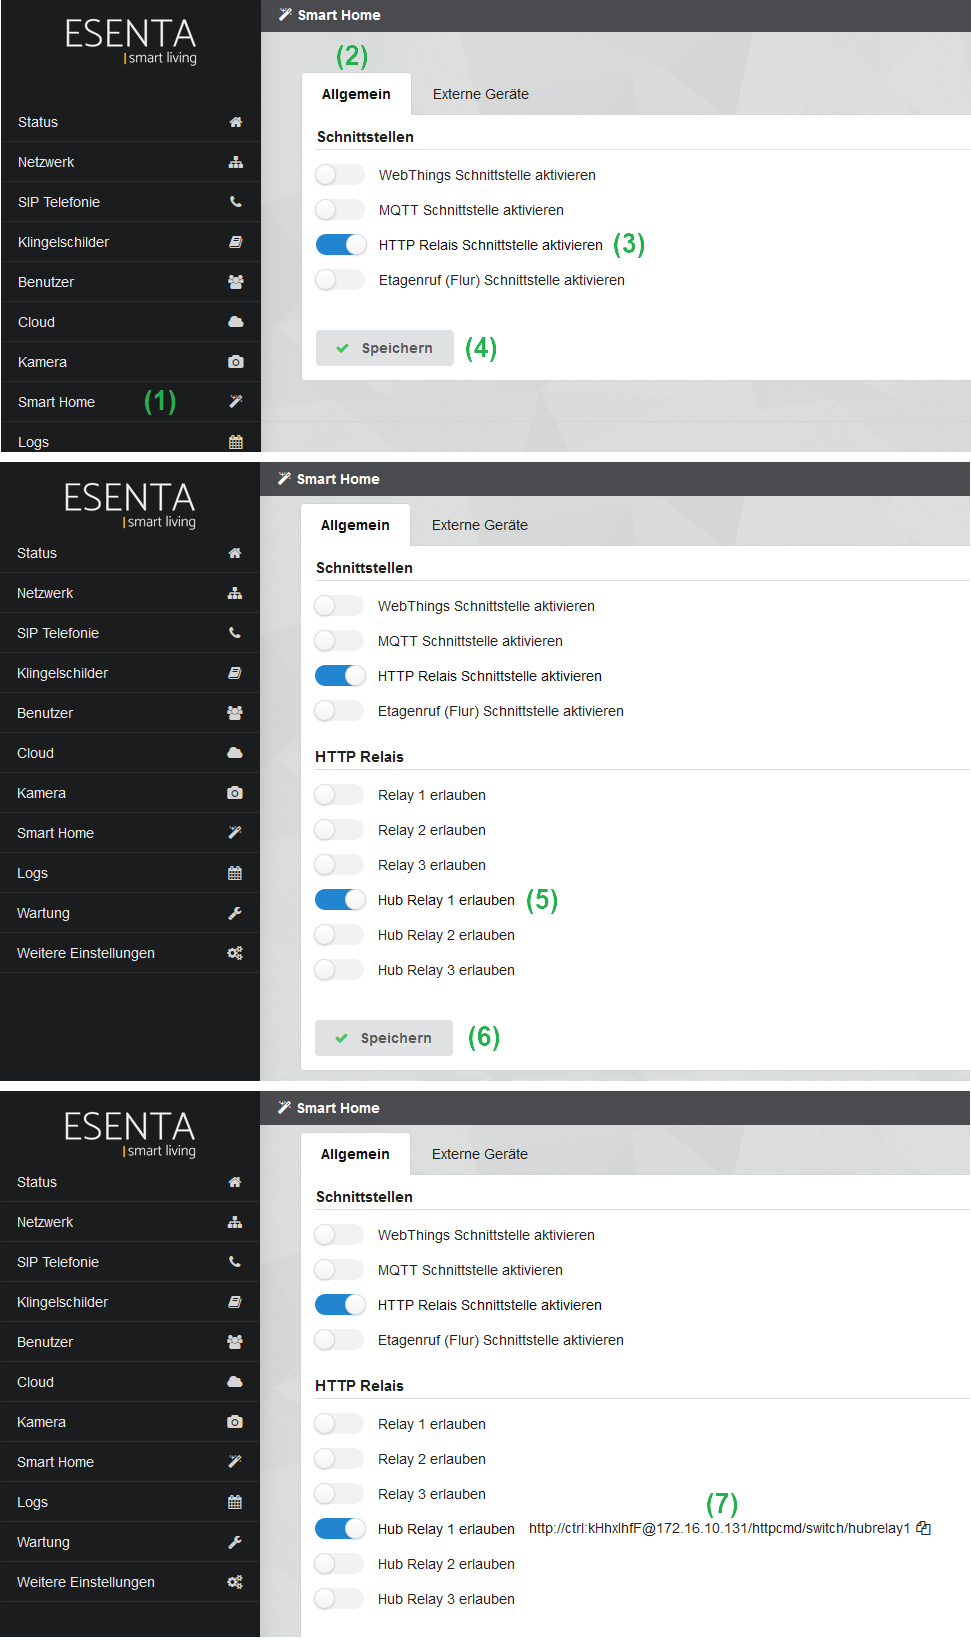
In the ESENTA Sias web interface, go to
- Smart Home
- General
- In the "Interfaces" section: Enable HTTP Relay Interface
- Confirm with Save.
- In the "HTTP Relay" section: enable the relay to which the door is connected.
- Confirm with Save.
- In the "HTTP Relay" section: copy the relay URL including http://
Switch to the i53W web interface and go to:
- Function Keys
- Tab: Function Keys
- In the row: DSS Key 3
- a) In the "Type" field: select Action URL
- b) In the "Name" field: enter Open (e.g. front door)
- c) In the "Value" field: paste the relay URL previously copied from the ESENTA Sias web interface
- d) In the "Subtype" field: select HTTP(s) Get
- Confirm with Apply.
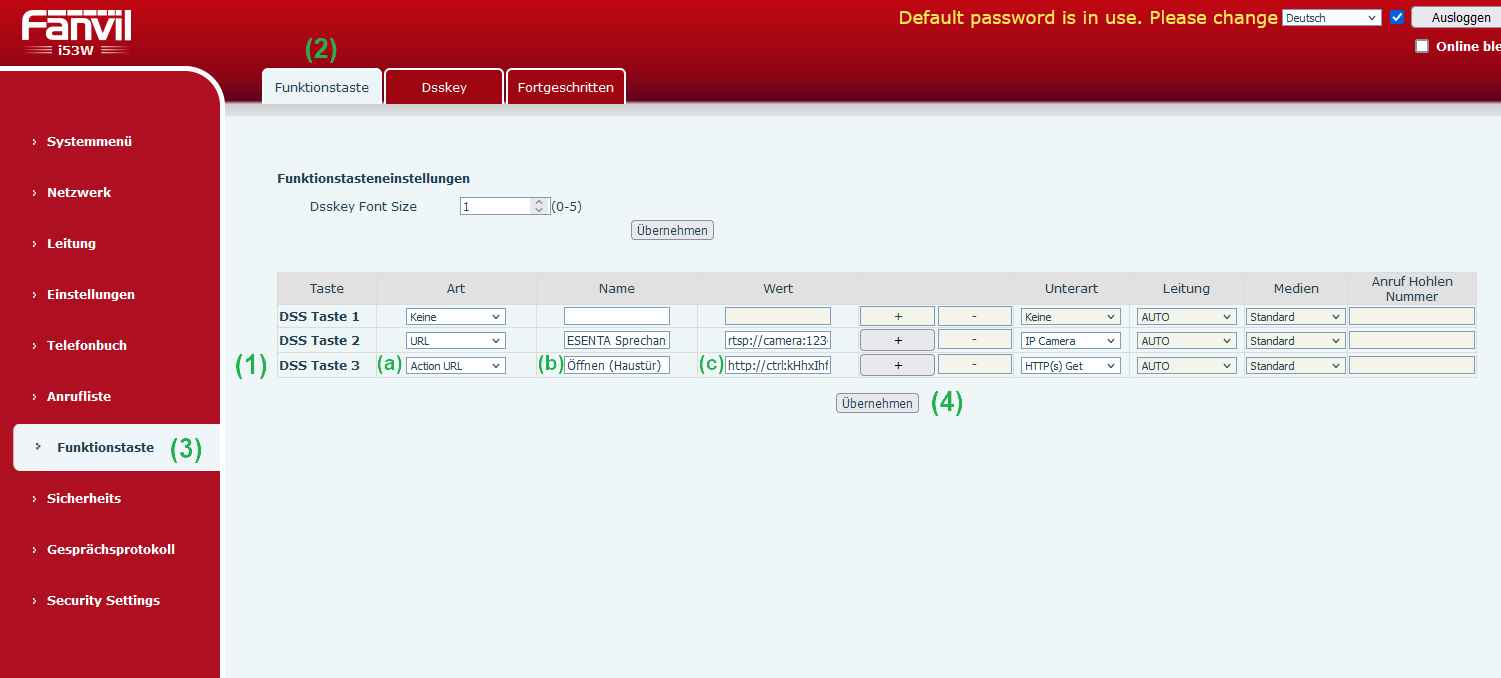
Testing the function: When the physical key button on the i53W is pressed, the corresponding relay on the ESENTA Sias should switch, opening the door/gate.
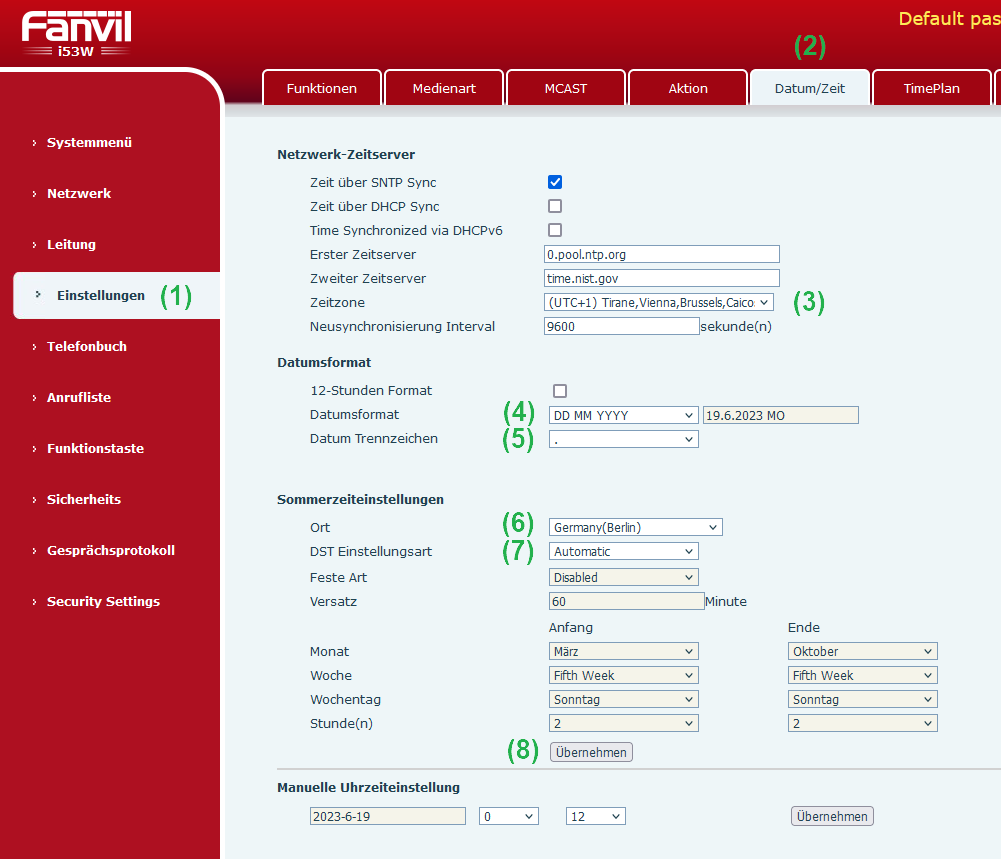
Setting Date & Time
Switch to the i53W web interface and go to:
- Settings
- Tab: Date/Time
- In the "Time Zone" row: select (UTC+1)
- In the "Date Format" row: select DD MM YYYY
- In the "Date Separator" row: select .
- In the "Location" row: select Germany(Berlin)
- In the "DST Setting Type" row: select Automatic
- Confirm with Apply.
Programming the Soft Keys on the i53W's Display
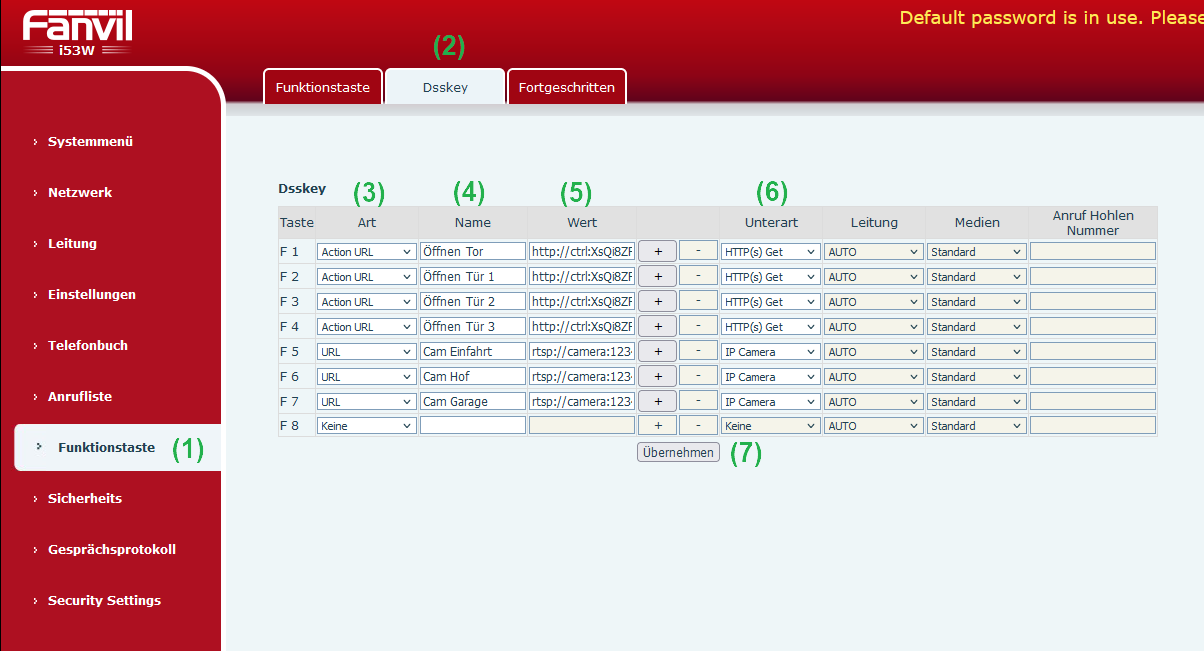
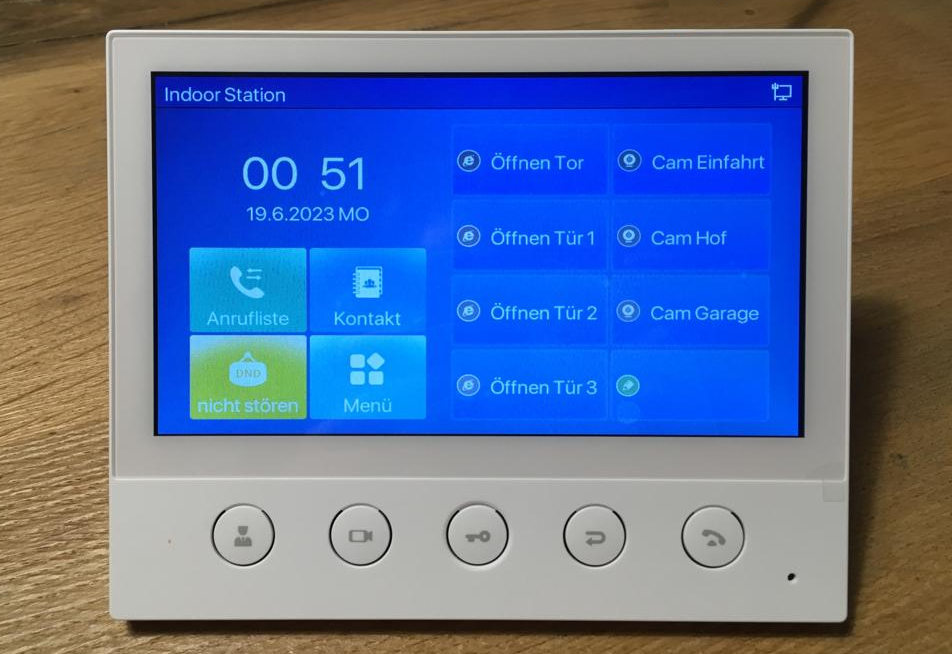
Switch to the i53W web interface and go to:
- Function Keys
- Tab: Dsskey
- In the "Type" field: the key function type can be selected.
- In the "Name" field: the key label can be set.
- In the "Value" field: the URL can be entered.
- In the "Subtype" field: the function subtype can be selected.
- All changes must be confirmed with Apply.
Changing the LCD Menu Password for "Advanced"
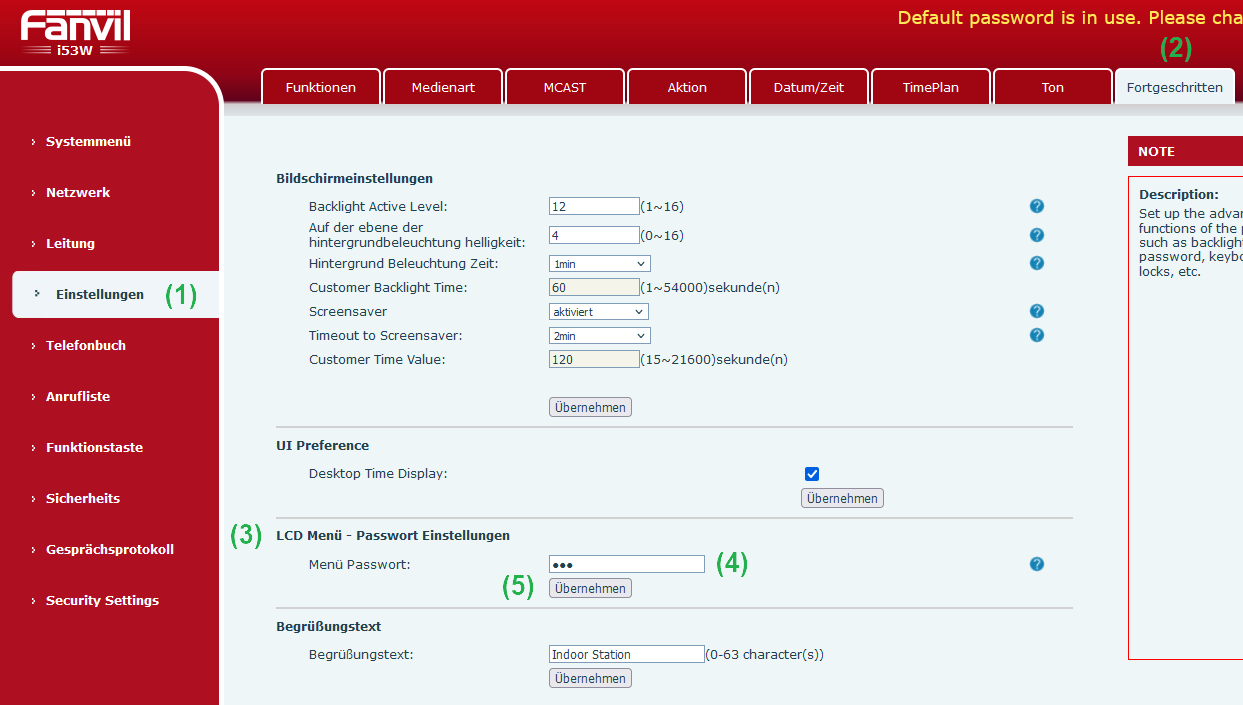
Switch to the i53W web interface and go to:
- Settings
- Tab: Advanced
- Subsection "LCD Menu – Set Password"
- In the "Menu Password" field: enter the new password (factory default: 123)
- Confirm with Apply.
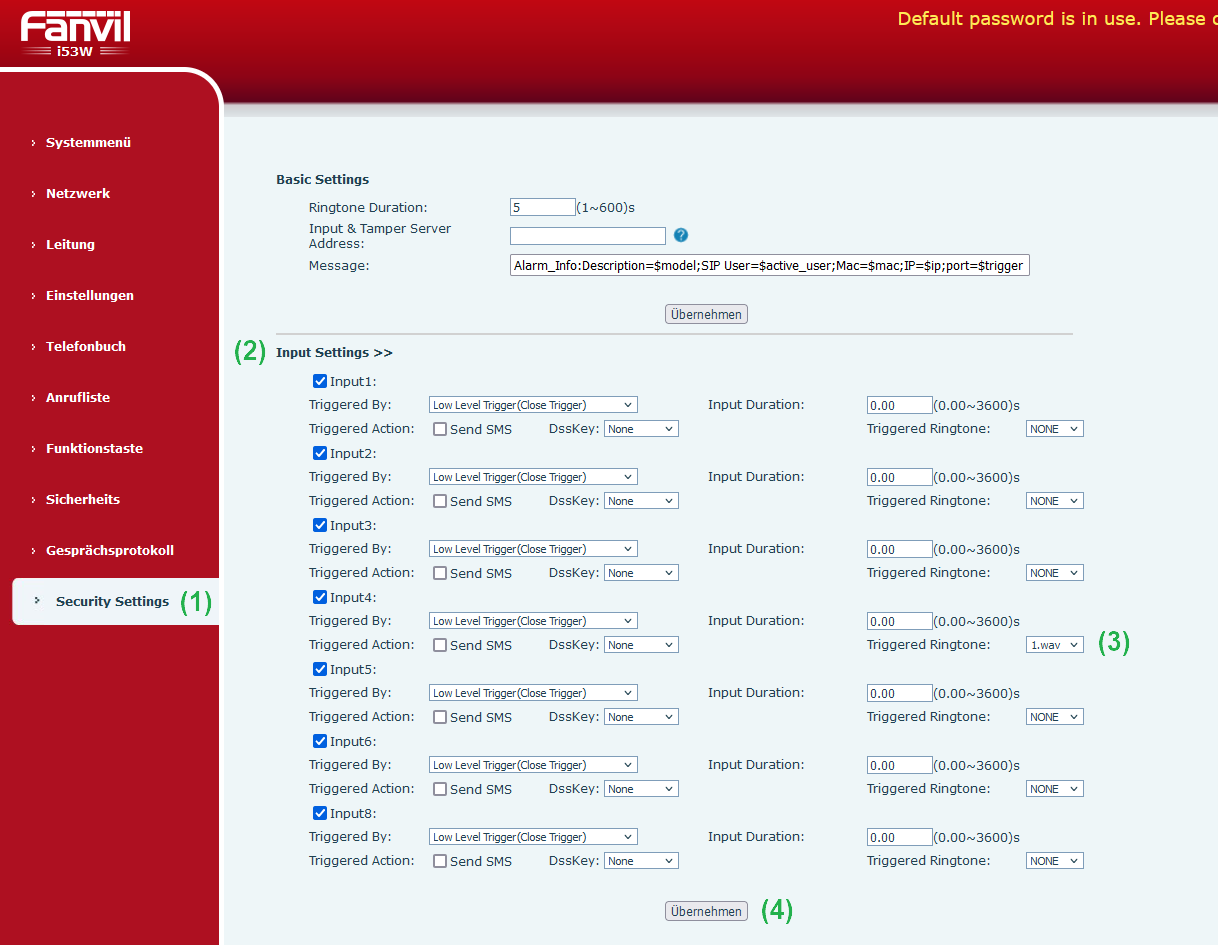
Connecting and Setting Up a Floor Call Button on the i53W
Switch to the i53W web interface and go to:
- Security Settings
- Open the "Input Settings" subsection
- In the "Input4" row, select the ringtone for the floor call
- Confirm with Apply.
- Connect the floor call button to the violet wire (IN4) and to one of the black (GND) wires of the 10-pin connector.
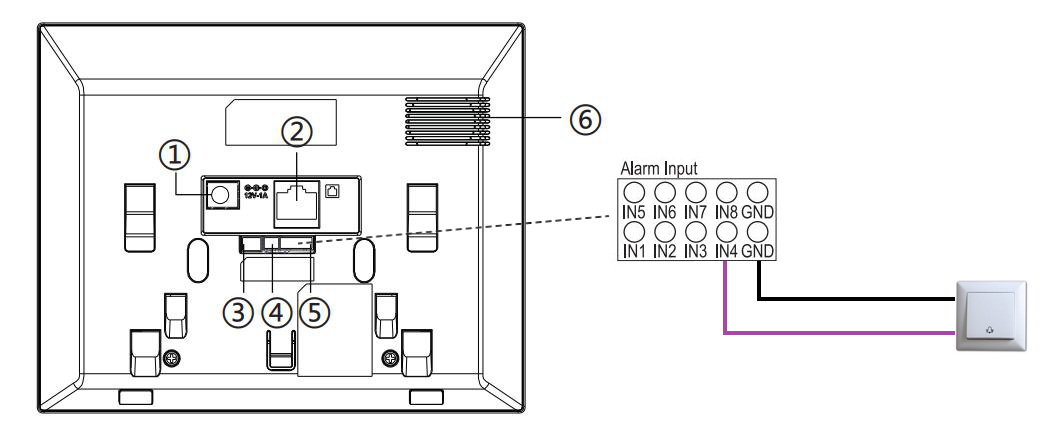
- Press the floor call button — the selected melody should now play on the i53W (the display remains in standby).


